Thursday, 8 September 2016
Smile
I recently discovered Carabelle stamps and bought several sets as I had trouble choosing! I used the lovely quirky girl on an ATC size piece of stampbord to make this piece.
Thursday, 30 June 2016
More softie monsters
My grandson asked me to make him another softie monster and stipulated that it be blue. Looking back at the Cloth, Paper, Scissors newsletter that had the pattern I spotted a triangle one so decided to make one of those as well and here they are. They met with approval.
Tuesday, 28 June 2016
Felt Flowers
I've seen a lot of pictures on Pinterest recently of felt flowers so I decided to have a go and here are the results. I dye cut circles and flower shapes and stitched them together with very basic stitches and some beads and sequins. Very satisfying to do and I like the results.
Friday, 3 June 2016
Jerry softie
A recent newsletter from Cloth, Paper, Scissors magazine included instructions for softies designed by Trixi Symonds and called Zenkidus. I made one for my grandson and I thought he came out looking a bit of a cross patch but my grandson declared he's smiling and his name is Jerry and he seems to have been a hit.
Thursday, 7 April 2016
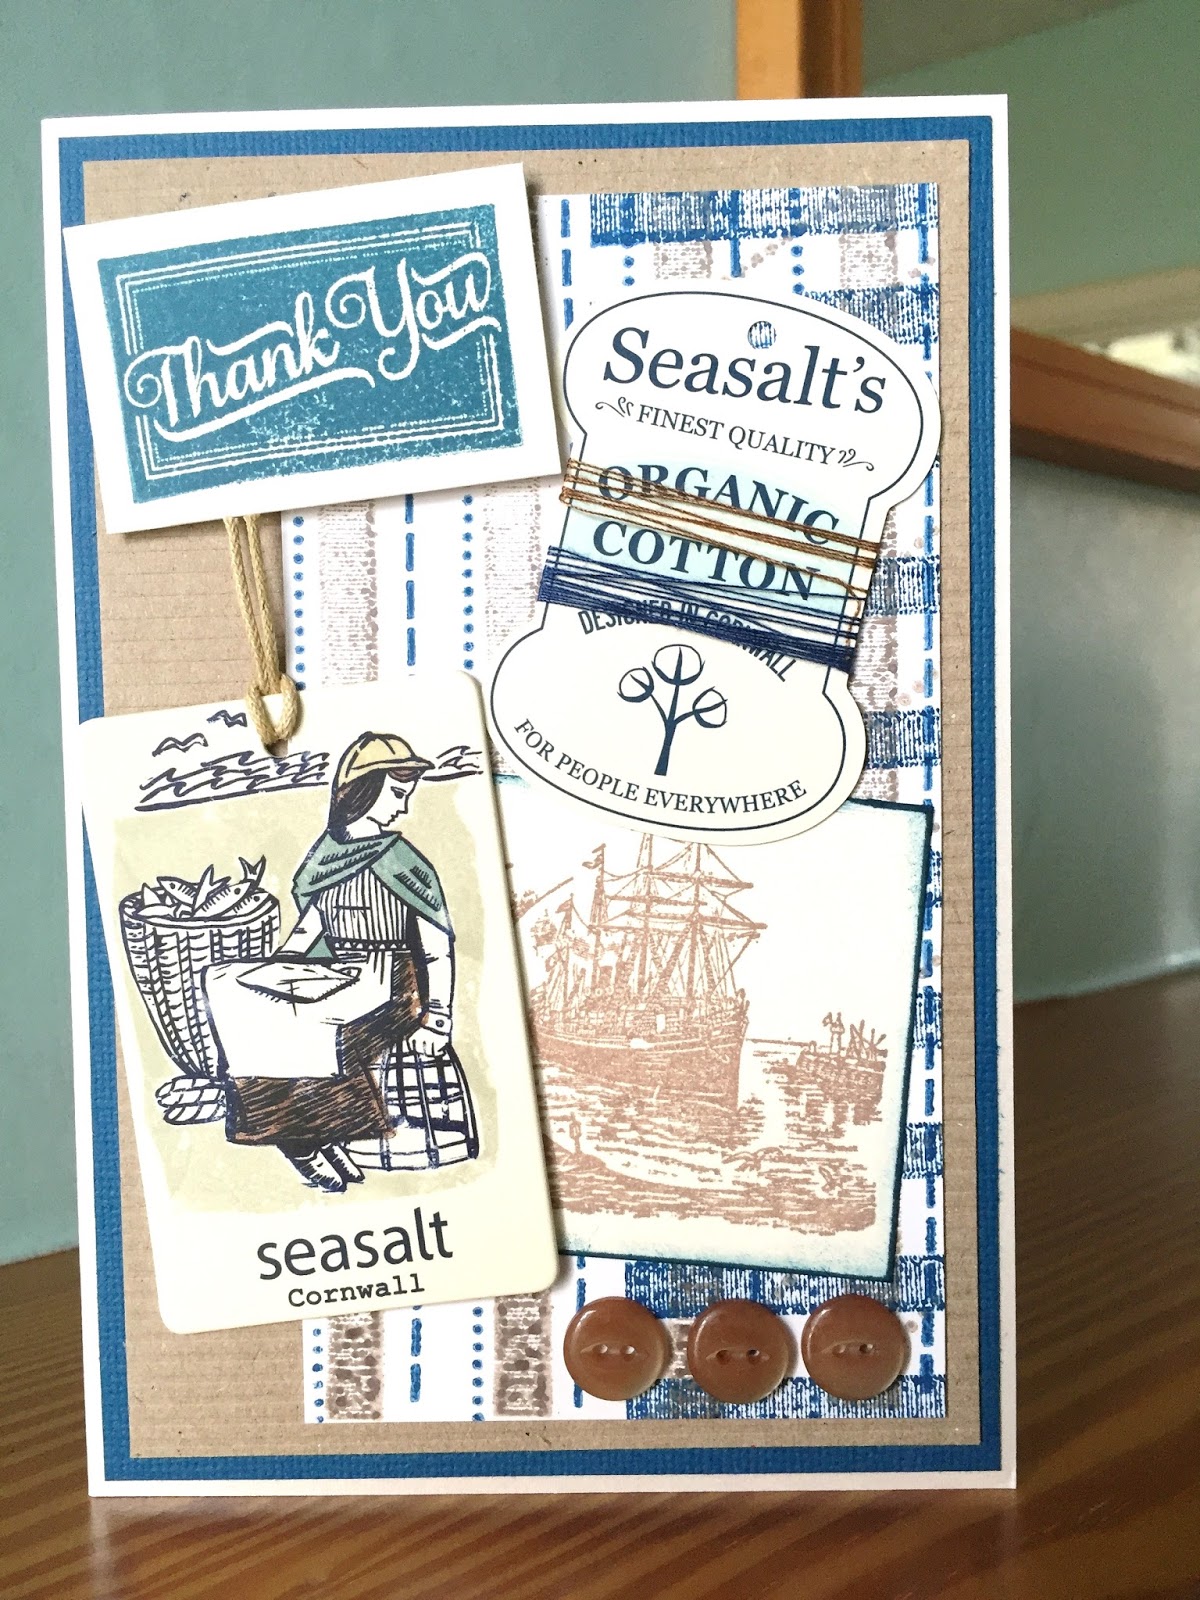
Seasalt card
I was lucky enough to be given a Seasalt gift voucher recently and said that as well as buying a scarf with it I would be able to use the clothing tags. My audience looked rather bemused so I made them a thank you card incorporating a couple of the tags and really liked the result.
Saturday, 16 January 2016
Buttons
I like watching Gina-B's passementerie shows on Create and Craft and have bought her button book and the wooden moulds but haven't really had a go. However I watched her create this button very quickly on her last show and decided to have a go myself and the 3 above are the result. The button card was done with a rubber stamp and I mounted the buttons for the purposes of the photo but eventually I'm thinking I should create a fabric postcard or small hanging to use the buttons on. The snowflake centre is a spacer bead meant for a necklace or bracelet but I love the look of them sewn on like that.
Thursday, 10 July 2014
Seasalt Inspiration
Seasalt has recently opened a new shop in Dorchester and was giving away these postcards to advertise their sale:
Looking at it I thought what a nice card it would make so as I happened to have a similar boat stamp by Anna Griffin I came up with this:
Really pleased with the way this worked and it certainly looks summery!
Looking at it I thought what a nice card it would make so as I happened to have a similar boat stamp by Anna Griffin I came up with this:
Really pleased with the way this worked and it certainly looks summery!
Monday, 19 May 2014
Triangles
This is a piece of canvas work that I've finally finished after at least 2 years messing about with it. I discarded it at least twice, took it off the frame I had it on and was about to unpick it at one point but eventually I rescued it and now am quite pleased with it. I had been playing about with the idea of triangles so thought I would just stitch some triangle shapes onto canvas and see where it led. I started with the purple threads and then I used the green and turquoise to make more elaborate patterns over the top and added some beads as well. The dark purple border is a kumihimo braid that I made and couched down then I added beads and a triangular buttonhole stitch as the edging. It's mounted on a piece of green/gold handmade paper (bought), then a canvas. The green behind which doesn't match is the wall!
I suppose it just shows you should persevere with an idea.
Friday, 7 February 2014
Bird hanging
While I'm in the mood for blogging I'll post this little stitched piece I made recently. I'd been making paper beads and wanted to use them for something so die cut a little bird (an old Spellbinders die) from some fabric and stitched it all together using mainly hand stitching and a little wooden twig. The finished size is about 10 by 8 inches.
Ombre effect inking
A project in Craft Stamper magazine prompted me to try getting this shaded effect using Distress Inks. It's also similar to a cross stitch project I did years ago which had this light to dark squares as well. I used 3 different sizes of Tonic nesting square dies and cut masks to ink through then 3 different colours of Distress inks in each colourway to build up the look. The stamp is an old Elusive Images one which looks really good against the background. I made a card in the blue colours first but then did this page in my sketchbook as a record of the inks that went well together.
I manage to do very little crafting these days aside from cards as needed hence the lack of blog posts but I'm hoping that one day I'll be more productive.
Tuesday, 12 February 2013
Apple Face
I've been making a little sketchbook featuring apples on and off for quite a while now. I got it out again today and made this page at the top, die cutting an apple with a Spellbinders die and then stamping the face (Hampton Art) on it. I built up a collage background and liked the result so much that I used left over pieces to make an ATC with another die cut apple.
Zentangling on stencils
I love the whole zentangle thing and though I can't aspire to the artistry of many of its practitioners I'm always amazed by how impressive even basic patterns can look. In these two samples I used a stencil as my starting point, drew round the outlines and then filled in the shapes with patterns. The top stencil was a basic grid, the bottom one is a stencil by Julie Fei-Fan Balzer and I did do it straight but couldn't manage to hold the sketchbook straight in the scanner!
Sunday, 2 December 2012
Water droplets
A couple of week ago I was reading Shosiplatypus's blog and came across this card she had made. At first I thought she had dropped water on it but then I realised it was actually a stamp and she pointed me to Designs by Ryn, a Canadian website. I ordered the water droplets stamp and the winter trees and they arrived in record quick time and are very good quality. I suddenly realised yesterday that I had forgotten a friend's birthday on Monday so though crafting time is very limited these days I managed to make this card using the droplets to make a lovely background. You can't tell from this photo unfortunately but I have also mixed a silver distress stain with broken china for the background and in real life it has a lovely gleam to it.
It's certainly worth looking at Ryn's website for something a bit different.
Saturday, 20 October 2012
I pad cover
When I got my ipad I bought a magnetic cover for it. I didn't like any of the colours available so I chose grey but I've hated how boring it looks. I kept wondering whether it was possible to decorate it in some way but was concerned I would damage it however last weekend I finally decided to have a go. I tried spraying glimmer mists but they wouldn't dry, just pooled on the surface so I mopped those off and instead used wooden stamps and Stewart Gill fabric paint to stamp a leaf and flower in their gorgeous Byzantia range. But then they wouldn't dry....... Being fabric paints they are usually ironed to set them but I didn't dare try that or use a heat tool. Gradually as the week went on they got drier but still felt tacky to the touch. Then today I had a touch of inspiration and I brushed mica powders over the top and then polished the surface with a tissue. It worked - it has taken away the tackiness and the powder has been polished in. That looks so much better than the boring grey!
I had some of the paint left on my craft sheet and hate wasting any so I stamped a scrap piece of fabric and a piece of paper to use it up. I liked the look of them so much that I then painted in all the flowers using Twinkling H2Os - love the finished pieces and will have to think of something to do with them.
The top picture is the fabric and the bottom one the paper.
Monday, 27 August 2012
Printer's tray
Recently I attended a workshop at the Stamp Attic with Hels Sheridan and we altered a Tando printer's tray. It was good fun and I especially liked Hels's technique of using lots of masks on the same piece of card, using them over the top of each other with different colours of ink. I meant to make a blue and green tray but it has come out very green but I like it anyway.
I went with my sister in law and you can click here to see her lovely version in very different colours.
Thanks to Hels and Wendy at the Stamp Attic for a good day.
I went with my sister in law and you can click here to see her lovely version in very different colours.
Thanks to Hels and Wendy at the Stamp Attic for a good day.
Chevrons & Cathedral Windows
I've noticed that chevrons are a big trend at the moment and I'd seen Jennifer McGuire using Hero Arts chevron stripe stamp to make really attractive cards. So I bought the stamp and played about with it to make a Thank you card. I stamped it on different coloured card and thought I'd make a set of cards but once I started cutting apart the chevrons and rematching them to get different colour combinations I ended up with 20 Thank You cards - enough to last me quite a while I think! Here are the photos en masse but it doesn't actually show all the colours as there are green combos in the mix as well.
Recently I saw Rosemary Merry on Create & Craft demonstrate how to make a Cathedral window patchwork card so as I love the patchwork look I had to have a go before I forgot how she did it.
I am rubbish at folding and origami techniques but, as Rosemary promised, this one is very forgiving and if the circles don't line up perfectly it doesn't matter and I was very pleased with the result. If only I had the patience to do it in real patchwork......
Friday, 15 June 2012
Distress markers and inks
I've been overindulging in new purchases lately but in an attempt to justify them I have been having a play. Above is a card made using distress markers. The peach stamp is a Joanna Sheen set and I stamped it on to Silk Art card and then coloured in with the markers. Because the card has a sheen I was able to use a watercolour brush and get a really blended look with the colouring which I loved. I had cards to make for two upcoming birthdays and I was so pleased with the results that I made them both the same. The label and border are cut with Spellbinder dies.
When the Fall and Winter Distress Inks were released they looked very similar colours to ones already available so I didn't buy them. But the Spring and Summer colours are very different from existing ones and they are really bright and right up my alley! I received the summer ones this week and the 3 ATCs shown here are made mixing the two sets and using PaperArtsy stamps. Great fun and much more summery than the weather!
Wednesday, 2 May 2012
Jesters Galore
Well, I don't know quite what this is but I had fun making it. I had the idea to mount one of these jester faces on a stick but I found I couldn't stop at one so ended up making seven and then I needed somewhere to display them. The masks are an Elusive Images stamp and a Judikins cube stamp. The base is 3 empty ribbon reels painted and stencilled and an empty cotton reel. Fun, but I don't know what I'll do with it now!
Apple Quilt
I've made my first quilt! Or rather mini quilt as it's approx 24 inches square. I say approx as I have real problems getting things straight, measuring, finishing neatly etc. but despite the wonkiness it has actually come out better than I ever thought it would. I used a Moda Chocolat fabric charm pack, and a Spellbinders die to cut the apples in my Cuttlebug - I got a very clean cut. I used bondaweb to stick the apples on and then handstitched round them, alternating stab stitch and cross stitch. I just tied the front to the backing fabric at the intersections. I'm pleased to have done it (especially as it's taken me months on and off) but I don't think I'll ever become a quilter!
Sunday, 15 April 2012
Cockerel fabric piece
I like reading Sew Somerset magazine and admire the fabric pieces in there and the way people seem to be able to build up a pleasing design from scraps. I've tried it a few times but have not been pleased with the results but finally this is more the look I've been going for.
I bought some DeColourant cream which removes colour from paper and fabric and last weekend I played around with it trying it on all sorts of different materials and using stamps and stencils. The cockerel (a wooden stamp from the Indian Block Company) was stamped with DeColourant on a piece of kitchen paper that had been used to mop up left over dyes from a tie-dye session. Quite colourful!
Subscribe to:
Posts (Atom)